Exercise 1: “Wohin klickt die Maus?”
The basic goal behind this exercise is to determine whether a given set of coordinates lie on a specific straight line segment or not, using linear algebra.
First, let’s define the requirements for our application:
- Provide a canvas for the user to draw line segments by dragging the mouse.
- Listen to double-clicks and determine if the click was performed on a line segment. If this is the case, remove the line from the canvas.
- This is an extra: Provide some UI-controls to set the line width and click tolerance (i.e. the size of the surrounding space to a line in which a click is still accepted as “being on the line”).
Let’s walk through some of the parts of the application. I will use an outside-in approach to explain how the application works:
Setting up the exercise
Since this exercise is using JavaFX-Canvas, it inherits from the AbstractCanvasExercise class described in the introduction. Our Exercise 1 basically initializes the following way:
- When the onExerciseInitialized hook is called, build the additional GUI elements relevant to this exercise (req. 3).
- Then, create all necessary event listeners to provide the desired functionalities.
We’ll skip the JavaFx-specific steps of loading user interfaces dynamically and dig right into the interactive part:
Listen for mouse actions
The establishEventListeners() method creates all listeners that are required to handle mouse clicks, drags and releases. Let’s start with the dragging:
container.addEventHandler(MouseEvent.MOUSE_DRAGGED, new EventHandler<MouseEvent>() {
    @Override
    public void handle(MouseEvent event) {
        if (isDragging) {
            currentLine.setEndCoordinates(event.getX(), event.getY());
            render();
        } else {
            isDragging = true;
            double x = event.getX();
            double y = event.getY();

            currentLine = new Line(x, y, x, y);
            currentLine.setThickness(thickness);
            drawables.add(currentLine);
        }
    }
});
We assign an anonymous EventHandler
- There have been draggin events prior to the current one and the exercise’s isDragging state variable is true. In this case we update the current line’s end coordinates to the current mouse coordinates (i.e. moving the line’s end along the mouse movement). Since the Canvas’s contents have been updated, we need to call the render method so that the Canvas is refreshed with the new material.
- The current event is the first dragging event (isDragging state variable is false). This means that the user has just started dragging and we have to create a fresh new line segment. We also set the line’s thickness and then add our new line to the list of drawables. All drawables are held in the exercise’s drawables collection.
Let’s look at the release event:
container.addEventHandler(MouseEvent.MOUSE_RELEASED, new EventHandler<MouseEvent>() {
    @Override
    public void handle(MouseEvent event) {
        if (isDragging) {
            isDragging = false;
            currentLine = null;
        }
    }
});
This listener quite simply sets the isDragging state variable to false if the user was dragging the mouse prior to the release event. It also removes the rerference to the current line. Notice that the line is still being referenced from the drawables collection so it continues to be drawn by the render routine.
The following listener is a little bit of an extra, too, but I think that it improves the user’s experience:
container.addEventHandler(MouseEvent.MOUSE_MOVED, new EventHandler<MouseEvent>() {
    @Override
    public void handle(MouseEvent event) {
        if (!isDragging) {
            for (ifCanvasDrawable drawable: drawables) {
                if (drawable.isPointInside(new Vector2D(event.getX(), event.getY()))) {
                    drawable.setSelected(true);
                } else {
                    drawable.setSelected(false);
                }
            }
            render();
        }
    }
});
For every MOUSE_MOVED event that is not a dragging event, we iterate over all drawables and check if any of them has been ‘hit’ by the mouse by calling the isPointInside method. If so, we set their state to ‘selected’. This will give the user a visual clue on the object’s ability for interactivity.
Finally, let’s look at how the lines can be deleted:
container.addEventHandler(MouseEvent.MOUSE_CLICKED, new EventHandler<MouseEvent>() {
    @Override
    public void handle(MouseEvent event) {
        if (event.getClickCount() == 2) {
            for (ifCanvasDrawable drawable: drawables) {
                if (drawable.isPointInside(new Vector2D(event.getX(), event.getY()))) {
                    drawable.setDeleted(true);
                }
            }
            cleanScene();
            render();
        }
    }
});
For every double-click (getClickCount() == 2) we check if the current mouse position matches any of the drawables. If so, we set their state to ‘deleted’. After that, we call the cleanScene method which deals with the deleted objects. Separating the concerns of marking objects as deleted and actually dealing (i.e. deleting) with marked objects gives us two advantages:
- We can omit the rather messy operation of manipulating a collection while it’s being iterated over.
- We are flexible to change the behaviour of deleting objects at any time without having to adapt the act of marking things for deletion. We could acutally remove the objects from the collection, but we could also leave them or copy them to a separate ‘deleted objects’ collection so that they are potentially recoverable (i.e. their being deleted is “undoable”).
Now that we’ve covered the major parts of the exercise, let’s look under the hood and check out how the lines are handled.
Drawing, deleting and interacting with line segments
In order to follow the object oriented path we use a LineSegment model that handles all business logic concerning line segments i.e. drawing, moving and checking if a given set of coordinates lies on the line segment. As mentioned earlier in the common section, every object that we want to draw on Canvas must implement the ifCanvasDrawable interface. This interface requires all implementing classes to have a draw method. So, let’s start with this.
Drawing lines
The draw method is passed a GraphicsContext object that allows us to draw on a Canvas. So, all we have to do to draw a line instance is to set the line properties and then draw the line using JavaFX built-in functions:
    @Override
    public void draw(GraphicsContext gc) {
        gc.setStroke(selected ? selectedColor : color);
        gc.setLineWidth(thickness);
        gc.strokeLine(
                pStart.getValue(0, 0),
                pStart.getValue(0, 1),
                pEnd.getValue(0, 0),
                pEnd.getValue(0, 1)
        );
    }
This method uses the LineSegment’s pStart and pEnd properties to set the segment’s start and end coordinates. Both properties are are Vector2D instances.
Next, let’s check out how we can determine if a given set of coordinates lies on the line segment or not.
In the zone
Calculating whether a point lies on a line segment using linear algebra involves two steps:
- If you draw a line to the given point from either end of the line segment, make sure that the angle between that new line and the line segment is smaller or equal to 90 degrees. If the point lies anywhere “behind” the line segment’s end points, we can already say that this point does not lie on the line segment.
- Calculate the distance between the point and the line. If the distance is within our declared tolerance, the point lies on the line.
Let’s look at these two steps in detail:
1. Determining angles
For this purpose we make use of some special properties of the Scalar Product or Dot Product (see: Dot Product) of two vectors:
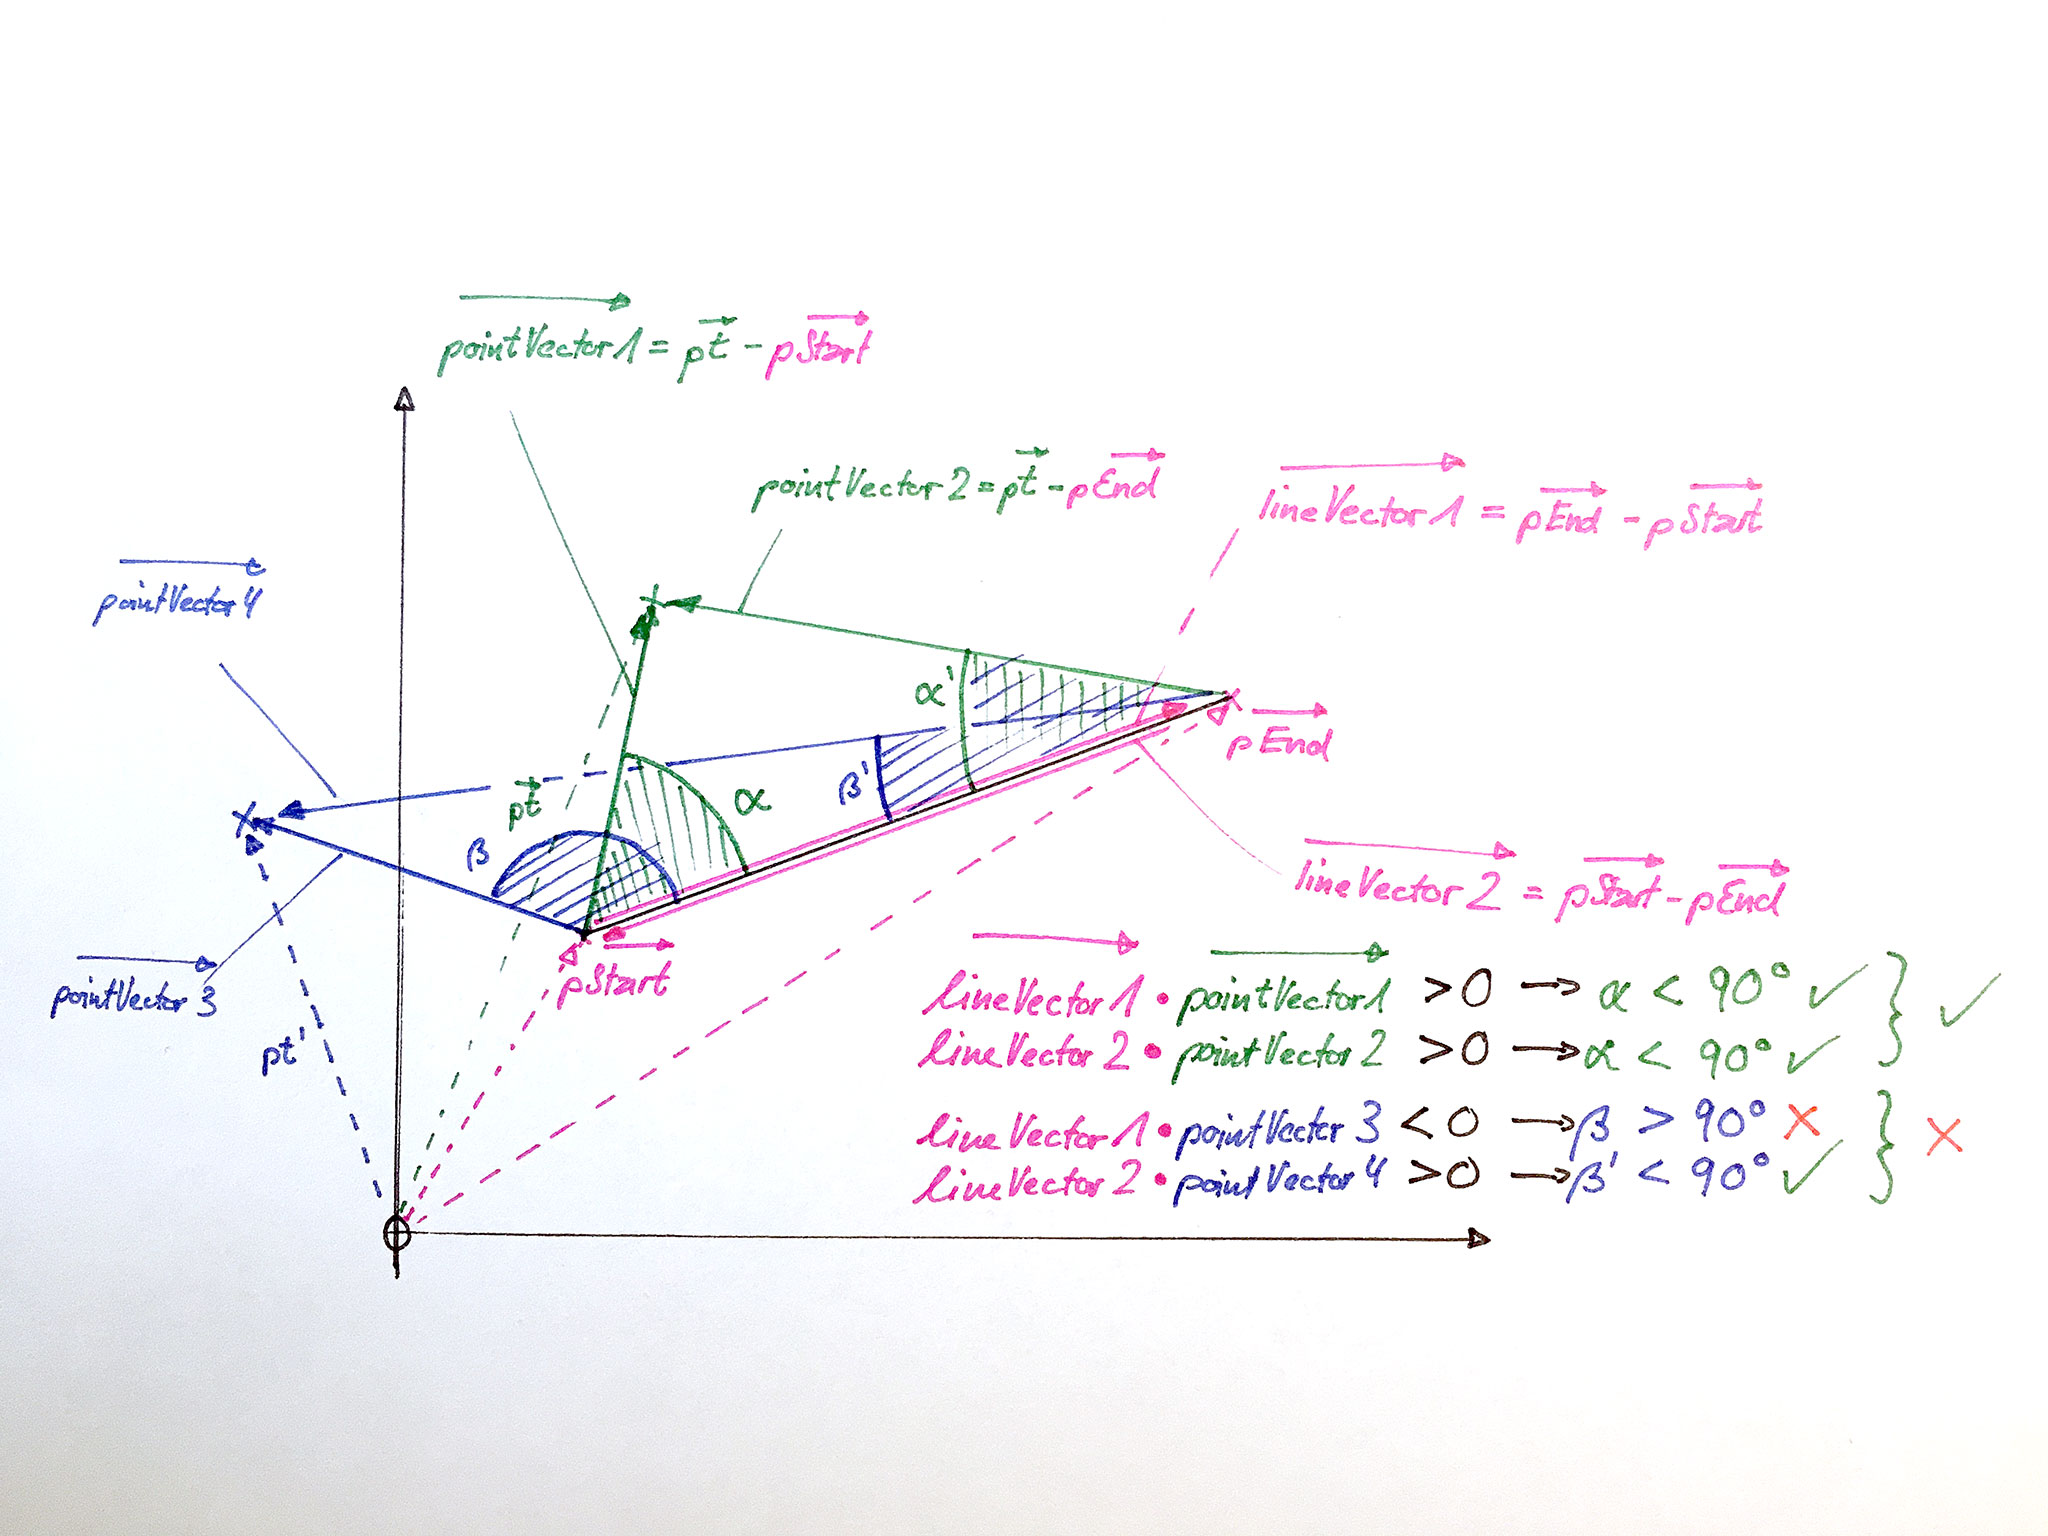
- For any two vectors where the angle between them is smaller than 90 degrees, the Scalar Product will be greater than 0.
- For any two vectors where the angle between them is greater than 90 degrees, the Scalar Product will be smaller than 0.
- For any two vectors where the angle between them is exactly 90 degrees, the Scalar Product will be 0.
Check out the following figure to get a visual idea of how this works:

In this example we have a line segment (pink) and we need to find out wheter either of the two points (green and blue) are within angle. In order to do so, we calculate the lineVectors and pointVectors by simple vector subtraction. Then, the Scalar Product between lineVector and pointVector gives us the answer: If the Scalar Product is greater than 0 for both ends of the line segment, this means that the point lies “between” the two ends of the line segment (green point). If this is not the case, however, the Scalar Product is smaller than 0 for one of the ends (blue point).
Since we’ve already implemented basic matrix operations, this makes the method quite easy:
private boolean isPointWithinAngle(Vector2D pt) {
    Vector2D lineVector1 = pEnd.difference(pStart);
    Vector2D lineVector2 = pStart.difference(pEnd);
    Vector2D pointVector1 = pt.difference(pStart);
    Vector2D pointVector2 = pt.difference(pEnd);

    return lineVector1.scalar(pointVector1) > 0 && lineVector2.scalar(pointVector2) > 0;
}
The return value of this method is True if both Scalar Products are greater than 0 and thus the point lies between the two line segment ends. The only thing remaining now is to find out how far the point is away from the line segment in order to tell if the point lies on the line segment or not:
2. Distance between point and line
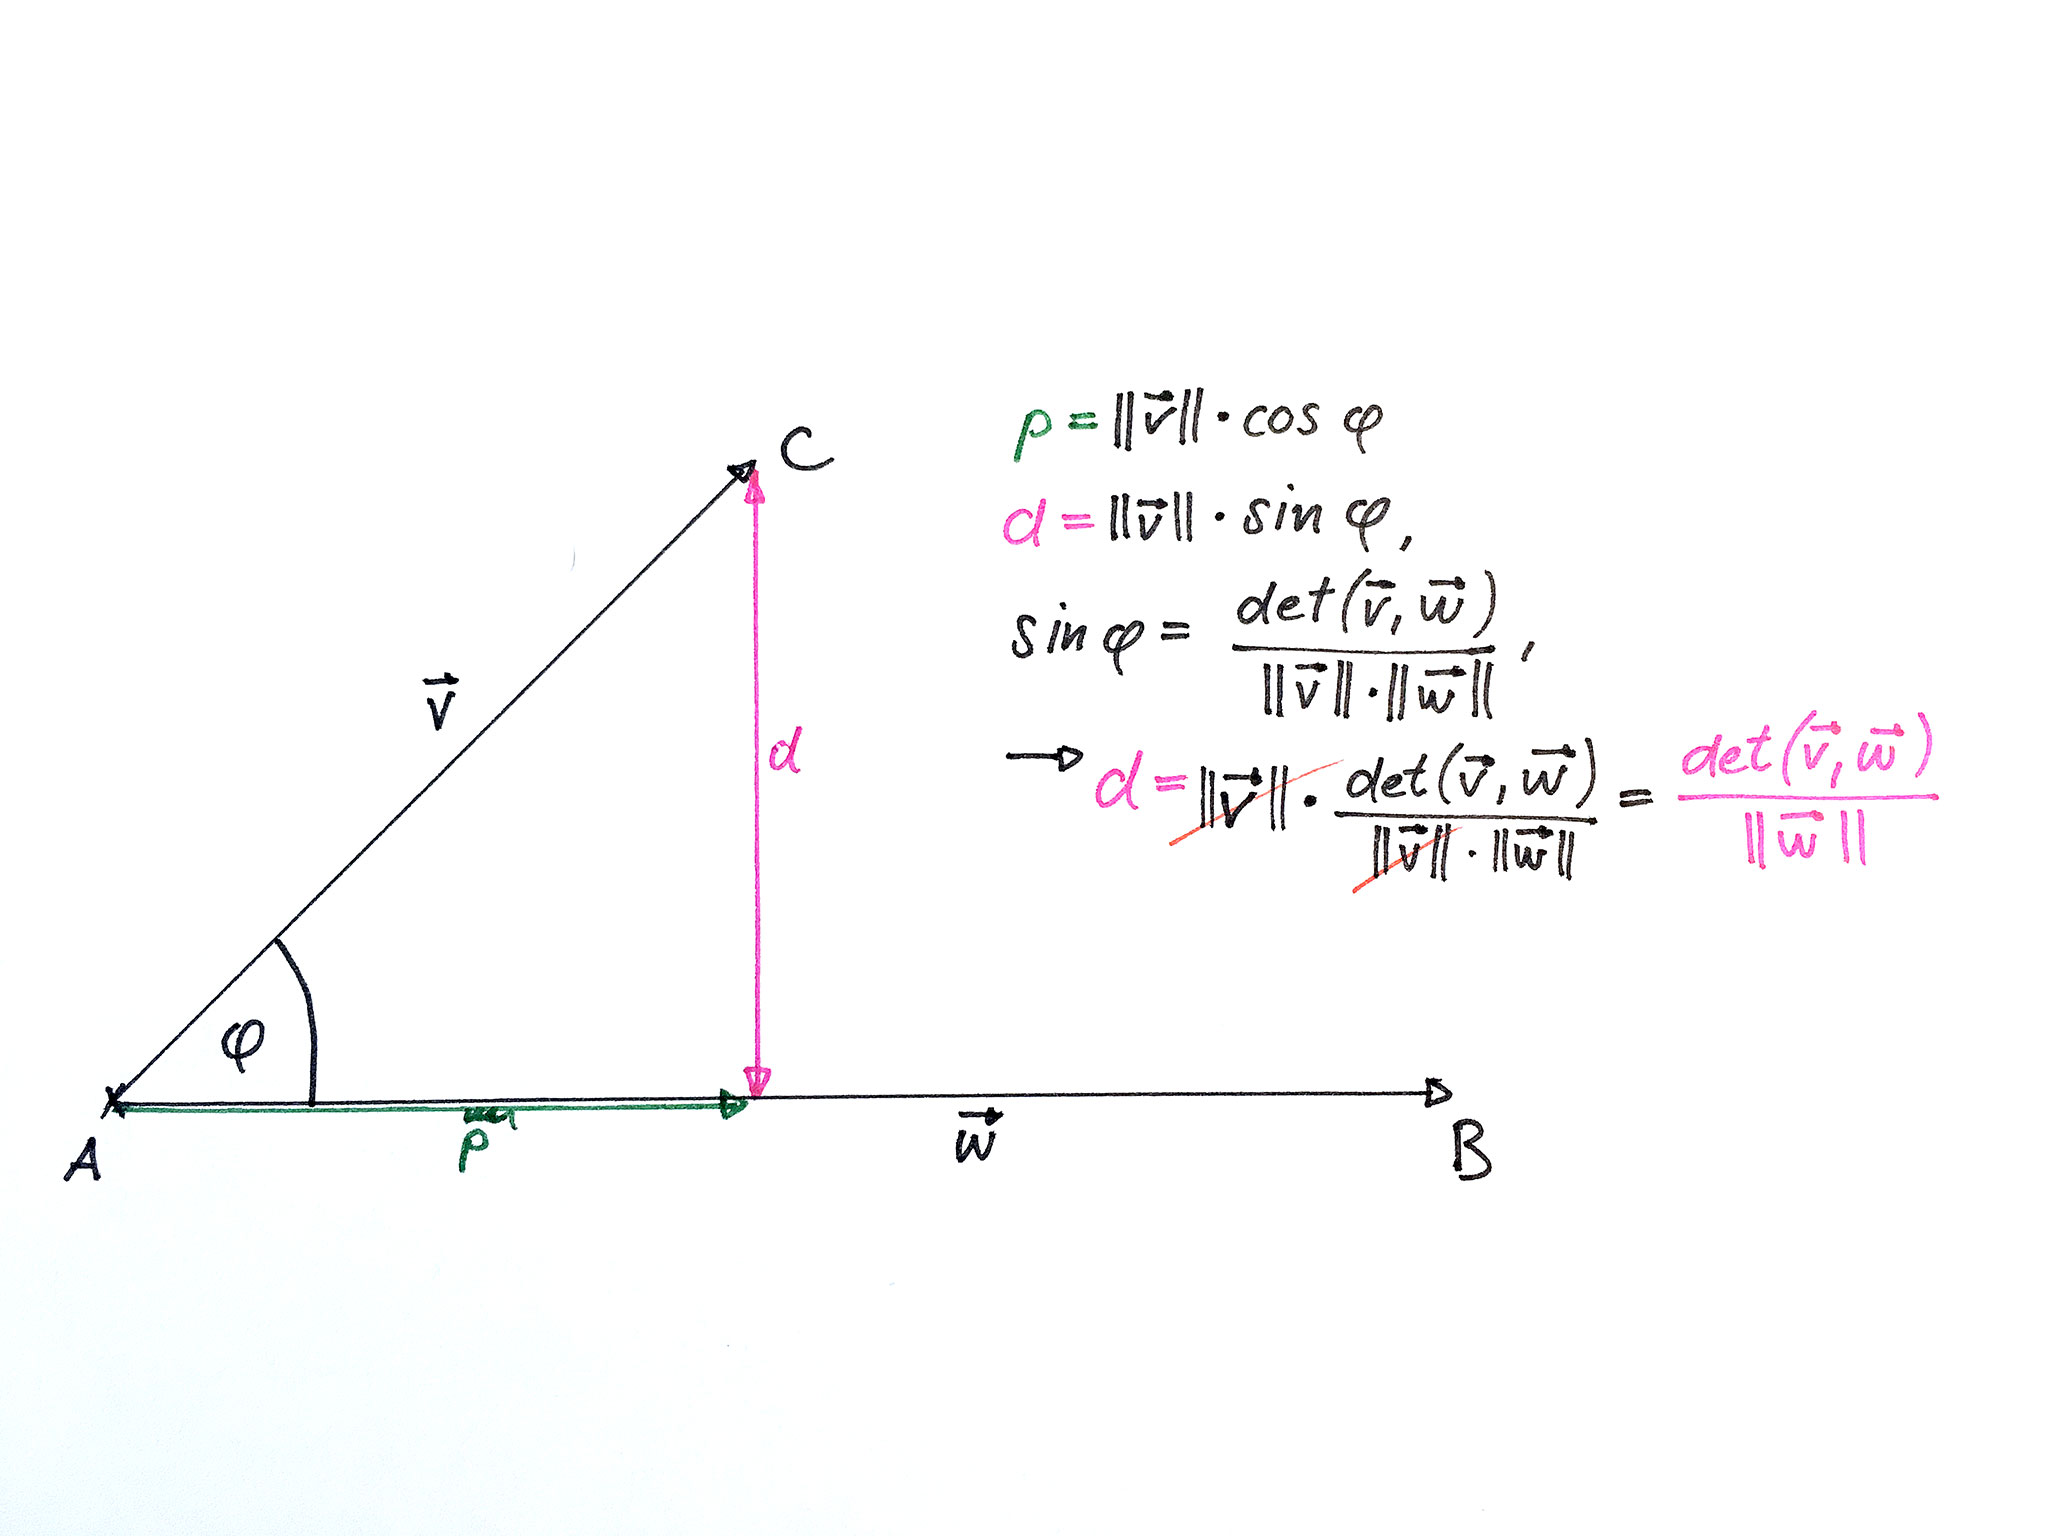
In order to calculate the distance between a given point and the straight line (which the line segment is part of), we could either use trigonometric functions (Sine in particular) or we could also use the determinant of two vectors.

For the sake of simplicity I will spare you the details of how to get from the Sine-form to the Determinant-form. As in the problem above, the calculation of the determinant is already covered in our common Vector2D class. And again, this makes the calculation of the distance quite simple:
 private boolean isPointInLine(Vector2D pt) {
     Vector2D lineVector = pEnd.difference(pStart);
     Vector2D pointVector = pt.difference(pStart);

     return Math.abs(pointVector.determinant(lineVector)) / lineVector.getLength() <= LineSegment.tolerance;
 }
Since the value of the determinant could be positive or negative (point is “above” or “below” the line) and we’re only interested in the distance (i.e. magnitude), we use the abs class-method of the Math class to get the absolute value. We also check the distance against our tolerance which is stored as class-variable on the LineSegment class. If the distance is within the tolerance, the method returns True, otherwise it returns False.
Wrapping it up
So, now that we know the two steps involved in determining if a point lies on a line segment, we just need to call both methods like so:
public boolean isPointInside(Vector2D pt) {
    return isPointWithinAngle(pt) && isPointInLine(pt);
}
Notice that I chose the order of the method calls deliberately. If you compare the two methods, you will see that isPointWithinAngle only uses additions whereas isPointInLine uses division. Since the CPU is much faster in calculating additions than divisions, it makes sense to call the less expensive method first. The JVM (and many other interpreters and compilers) uses a concept called “Short-Circuit Evaluation” which means that the evaluation in a statement with logical operators such as “&&” or “||” is aborted as soon as the overall result is known from the already evaluated components.
In our particular case this means that isPointInLine (divisions) is only called if isPointWithinAngle (additions) returns True. In every other case we can safely say that the point is not on the line segment and omit any further calculations involving division.
I hope this documentation helps you find your way around Exercise 1.